
Here is my fourth prop :> this is one that I’ve wanted to make for myself since I was a child, but I didn’t feel like I had enough skill to create it! Until now!
Okay, a bit of backstory, Cardcaptor Sakura is a series that has been with me a very long time, I’ve loved the series since I was a child she always tried to make me happy.
Now, let’s get to that write-up! This staff took a lot less time than my last two big projects ([Atiesh, Greatstaff of the Guardian] and Poro Rider Sejuani’s Flail) this one took around a week, as opposed to the other two taking a month and a half, and a month, respectively; this one also has a few more techniques, with a few of them actually being a bit advanced!
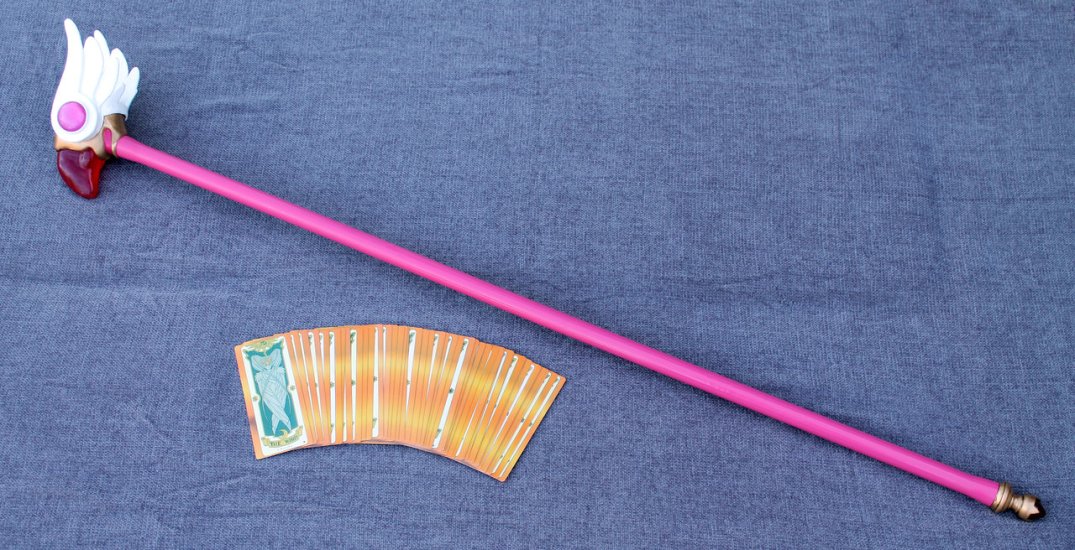
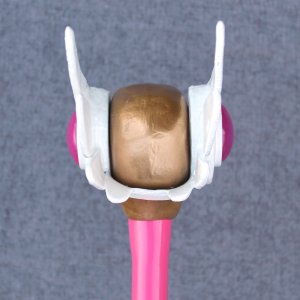
I started with the rod, as it was the easiest thing to get out of the way! The rod is a lightweight pine dowel that I flared at each end using a metal washer that was about 5mm wider in circumference than the dowel was, I flared it using putty :> after the putty dried, I sanded it down to make a nice smooth flare at each end! The rod, with its newly sanded flared ends received a white primer, another round of sanding, and then finally a bright pretty pink coat of paint! I also drilled a hole in either end of the dowel to allow for a smaller dowel (around 5mm in circumference) to be slotted and glued in place to hold the head and base piece in place!
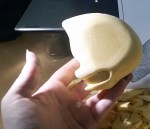
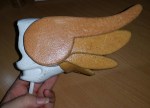
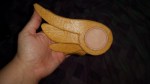
Next I created the head! The head is made from carved insulation foam with a worbla shell for strength, it was then sanded, primed, sanded again and then finally coated with a super shiny gold spray paint (which sadly doesn’t pick up in photos); the wings are made with a specially made pattern and craft foam, the foam was then sandwiched between worbla for extra strength, and like with the head the wings were also sanded, primed, and sanded again before they were then coated with a high-gloss white spray paint, and finally glued to the main piece (the head) with a super strong epoxy; the “nose” and “eye” gems of the head are made with tinted resin (and with a scary new type of resin too, if I might say so!) the three gems were then glued into the “nose cavity” and “eye sockets” with the same epoxy! This was then glued to the rod by drilling a hole in the insulation foam and gluing the 6mm dowel in place.


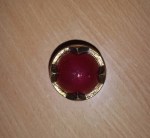
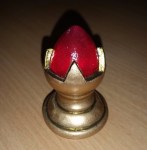
And finally, the pretty base piece! This entire piece is created with resin :> I hand-sculpted the piece, moulded it, and then poured tinted red (and sparkly!) resin into the mould (this was poured and cured at the same time and with the same batch of resin as the “nose” gem. After curing, the piece was de-moulded and sanded and the red gem was buffed and masked off; after the gem was masked, the rest of the piece was coated with two coats of the same super shiny gold spray paint. I then “antiqued” it a little bit by rubbing a darkened gold acrylic paint into the little nooks of the piece. The base piece was then glued to the rod with epoxy.
In total, the length of the staff is 141cm (55.51inches) from the tip of the wings to the tip of the base piece; the head piece is 12cm (4.72inches) from wing tip to where it attached to the rod; The rod itself is 122cm (48.03inches); and the base piece is 7cm (2.75inches) from tip to where it is attached to the rod. It’s also much lighter than my previous two props, coming in at 800g (1.76pounds)!
I really enjoyed this project too :> mostly because this is actually a prop that I’ve wanted ever since I was a kid
